Hallway Art Display


 Took these photos the day I installed the kids art hanger boards.  This gives the kids their own space, in our main hallway, to display their works of art, drawings, paintings, colourings, etc.


Cut boards to length, rounded edges, counter sunk screws holes, painted white, and hot glued some painted clothes pins.

Potato Bin

I finished this project several months ago.  I'm calling this my first project woodworking project.  Although I've made things out of wood in the past (like this tie rack) woodworking hasn't been a consistent hobby.  My old house kept me busy with renovation projects and it didn't have a space for my tools.  I now have a space to work inside this was the project I started first in my woodshop. 
I started this project then finished some other projects along the way such as a cross cut sled so I could cut the 12” wide pine boards for the front and the back. I made a mistake and cut the back the same size as the front oops! (my little helper was busy colouring on the parts list so I was just cutting away.) I was told the potatoes would be left in the bag anyway so now it’s just a big “vent hole” in the back (saved me from drilling a bunch of smaller holes or using peg board like the plan called for.)

Aromatic Cedar Tie Rack


It has been a while since my last post.  I've been busy this past summer.  I built a shed, closet shelves, french cleats in the workshop, to name a few projects.  I just acquired some used kitchen cabinets to further organize the shop and finally have a place for easy access to my tools.

I recently hung up my tie rack --getting my ties back to their rightful place in the closet.


I had made this rack several years ago from a piece of Aromatic Cedar.  I love the cedar smell and I've never had moths in my closet.  At the time owning a drill press was still a dream.  I had a table saw, a router, and a regular drill (no press -just freehand).  I remember when I finished drilling the holes and gluing the pegs in place I thought WOW! I actually got the holes straight....until I picked up the tie rack, looked at it from the side, and noticed that all the pegs were slanted to one side.  I think it looks good with all the ties.  My favorite tie is currently the all purple tie 5th from the right.


Note: Yes I leave my ties tied--saves time in the morning.


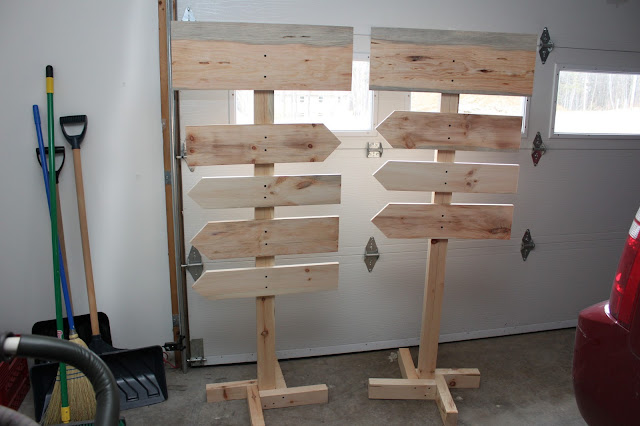
Directional Signage and Posts


I was asked to build some signs and sign posts for a school carnival.  I was supplied with wood cut from a backyard sawmill.  The boards for the directional signs were about 5, 8 and 10 inches wide and the post were a full 2x3 inches.

Having never made sign posts before I was a little worried that the signs would be a little wobbly and may tip over.  After searching around the interweb I found a few photos of some sign posts that looked pretty sturdy.

The options I found were:
1) Coat Rack

2) Plywood base

3) Wedding Sign (Four support legs)

I wanted to keep it simple so I ruled out the coat rack design.  When the wood arrived I wasn't given any plywood so that ruled out the plywood base design.  I decided to try the wedding sign design.

I cut the posts to 5 feet.  I cut four legs at 12 inches in length and screwed  them to the post and into the adjacent legs (note I did set the post up a 1/4 inch so it wouldn't touch the floor.


The directional signs as well as the top sign (You are here or welcome sign) are 2 feet long and the arrows are two 45 degree cuts.  I predrilled and counter sunk each hole in the signs.  I counter sunk both sides thinking I would also pre-drill the post holes too however when sanding both sides I remembered I wanted to keep it simple so if they want the signs to point the other direction all they need to do is rotate the sign 180 degrees --the holes don't need to line up -- there is lots of wood to screw into.


Once all the signs were installed the sign posts were very stable so I was happy.

~~~
View more projects on my you tube channel.
~~~

Google Maps Place Marker Bird House


As soon as I saw this post on Lumberjocks I wanted to make this bird house design.

I downloaded a photo of the google place marker. Imported it into Sketchup to use as a guide for the proportions. I'm still learning sketckup but once I found the "offset" button things went really smoothly --hint the inner boarder is an offset of the outline. I set the print to 1:1 and printed off a number of blank pages. If anyone knows how to control how to position a drawing on a page please let me know--I still have not figured it out other than printing only page 5 of 9 pages.

I spray glued the template on a piece of 1"x 10" pine; roughly cut it out on the bandsaw; then sanded up to the line. I then cut some scrapes to the shape of the can and attached to the back side of the facade; drilled some pilot holes and attached the facade to the can.


The can is a reused coffee can. I drilled holes in the bottom for drainage and attached some "L" brackets on the back. If I was to make another one I'd just drill the holes though the back of the can and then attach the facade.

Up until this project I've only spray painted things using one colour. I traced out the wood shape on a piece of cardboard and cut out the shapes to mask out the areas. I think it turned out pretty good as the paint didn't bleed as much as I thought it would.

Enjoy making your own google place marker bird house.

A Designer, Shu-Chun Hsiao, has installed his google map bird houses around his city, ccheck out his site here.


Handy Manny Birthday Party


I crafted 14 hammers (Pat) and screwdrivers (Turner) for a Handy Manny themed birthday party to go with tools belts my Wife made. The kids will be painting their tools so I left them unfinished.
The hammer heads are 3” cut from a 2×2 with a 3/4”dowel for a handle. I clamped a stop block on the drill press, drilled 3/4” deep, added some glue and hammered in the dowel (no nails or screws used in this project).
The screwdriver handles are 1” dowel 3” long with 5/8” dowel drilled and glued in place. I cut the flat heads on the band saw. The 5/8” dowels are 3 1/4” long set in the handle 3/4”. I made a jig out of 1/2 plywood to mark the dowel centres and to hold the dowel on the drill press.
I sanded down the edges and corners.


Swiveling Screwdriver Shelves


Swiveling Screwdriver Shelves

Made these two swiveling screwdriver shelves to help keep my bench free of tools. The idea was from a CD that came with a sample of Woodsmith magazine. Made from leftover maple hardwood flooring. The factory finish is holding up well.  The plans called for a lock nut but all I had were blots with a lock washers and regular nuts so that is what I used and it works.

Note the small clamps are just being stored on the edge of the rack.


Swiveling Screwdriver Shelves


Swiveling Screwdriver Shelves


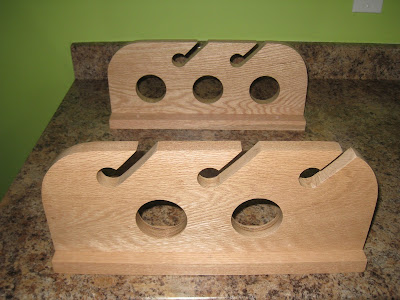
Fishing Rod Rack


I needed something to keep the fishing rods out of reach from the “little anglers” (Read: little tanglers). Inspired by Carter’s project here.
I realized after I created the pattern in Illustrator (see below for template PDF files) and printed it out that I only really needed space for 5 rods and not 9 so I shortened the design by overlapping the paper template that I printed out.
The plan was to put the kids rods in the holder as well but their rods are so short that at a 16 inch spacing the other rods were at too steep an angle. I ended up spacing the racks 32 inches to hit the next stud. The kids fishing poles will fit up there in a few seasons when they get upgrades. The big holes are actually 2 1/4 as I didn’t have a 2” hole saw as laid out on my template. The big holes were slow going on my 8” drill press. Small holes are 1” on my template and in the wood.


You could space out the two ends further if you had longer rods or wanted to store the fishing rods at full length.

Here are the templates I created that you can download in PDF format.  One end is called side A and the other end is side B.


Side A - Fishing Rod Rack.pdf


Side B - Fishing Rod Rack.pdf

Cars Birthday Party Theme


My Wife saw a photo somewhere on pinterest of a Lightning McQueen cut-out of plywood that the kids could change the tires...and well...here is our plywood McQueen complete with changeable tires.

 I had a leftover piece of meranti plywood from a parade float lying around that we were using to shoot hockey balls at instead of denting up the wall.


The image I used as my guide, to draw McQueen, was taken at an angle so I skewed the image back to "side on" as best I could (you can see the reference image on the plywood in the above photo.)  The plywood was previously cut to 4x6.  We wanted something that was taller than most of the kids so I stretched the proportions of the photo so that when scaled up to size it would fill as much of the plywood as possible.


I drew a grid on the plywood to scale up the photo.  Then just used the grid a guide to draw McQueen.  I traced the lines with a black marker, cut him out, and painted him with some Dollar Store craft paint (the red paint was the only colour that did hid the grid).

I put one bolt in the centre of the tire, counter sunk the bolt in a piece of leftover flooring and set in place with automotive glue.

The kids loved changing the tires and taking the nuts on and off.   If I did it again I would either hunt for larger nuts and bolts to use or counter sink the nuts in a piece of wood.  The younger kids had a hard time screwing the nut back on, but it sure kept them busy!

Ka Chow!

Bird House

Woodified Bird House
I came across a photo of a bird house (see link) that looked pretty cool so I decided to make my own version.  This is the result.  I used some left over hardwood flooring (Maple).  I ripped the pre-finished flooring into strips and cut tenons on either end.  The tenons on one piece are on the face of the maple strips and on the next piece the tenons are on the back of the so when stacked in the groove they're staggered in and out.   The exterior is pine stained dark and the screws are stainless steel.  The bird house is 11 inches tall 6 inches wide and 5.5 inches deep and the hole is 1.25 inches.  The bottom has quarter inch holes for drainage.

My cut list was as follows:
Pine (1x6)
2@ 6x5.5 (top & bottom)
2@ 10.5x5.5 (sides)
1@ 10.25x4.5 (back)

Maple (Flooring)
7@ 5x1.5
Woodified Bird House


The hole should have been  1 1/8 inch for a black-capped chickadee but I didn't have a 1 1/8 hole bit so I when with the next closest hole saw being a 1 1/4 bit


1/4 inch drainage holes in bottom.
Gap at the top for venting and a hole in the centre to hang up the bird house.


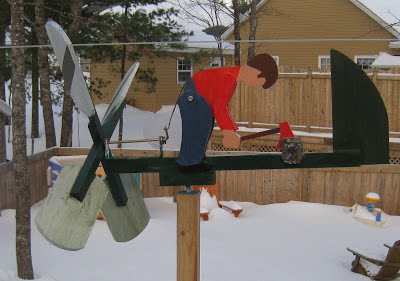
Wood Chopper Whirligig

I’ve been picking away at this for a few months now. It felt good to put the last sealer coat on today. I wasn’t sure if I needed to balance the blades or the pivot point or not so I took him outside for a test chop. He start chopping with a gust of wind so I left him as is.
I got the plans from this book Making Animated Whirligigs (Dover Woodworking).  I modified the chopping block from the original plans because I forgot to cut out the chopping block. I ended up using a branch for the chopping block.  The sail is also smaller as I couldn't resaw a piece of 6x8 in pine on my tablesaw.  My sail is 4x6 in.  The sail has no problem directing the blades into the wind.

Also, I couldn't bend a 1/4 bolt over a rock in my backyard so I used a brass rod as suggested in another whirligig book found here:The Art And Craft of Whirligig Construction

However I just hammered the brass over the edge of a sledge hammer instead of soldering.
If I had an anvil I could have bend the 1/4in carriage bolt no problem.